

The Feature planning stage lists the holes CAM Assist found on the part, grouped by shape. Use it to check each group, choose which setups machine it, split or leave out groups, and set hole details such as threads and depths.
Before you start
- Wait for the machinability assessment to finish. Until it does, the stage shows Waiting for the machinability assessment….
- The Feature planning link in the top bar is unavailable until the assessment has finished with no severe issues and the 3D model has loaded. See The guided workflow stages.
Open Feature planning
- Click Feature planning in the top bar, or click Next: Feature planning at the bottom of the Setups stage.
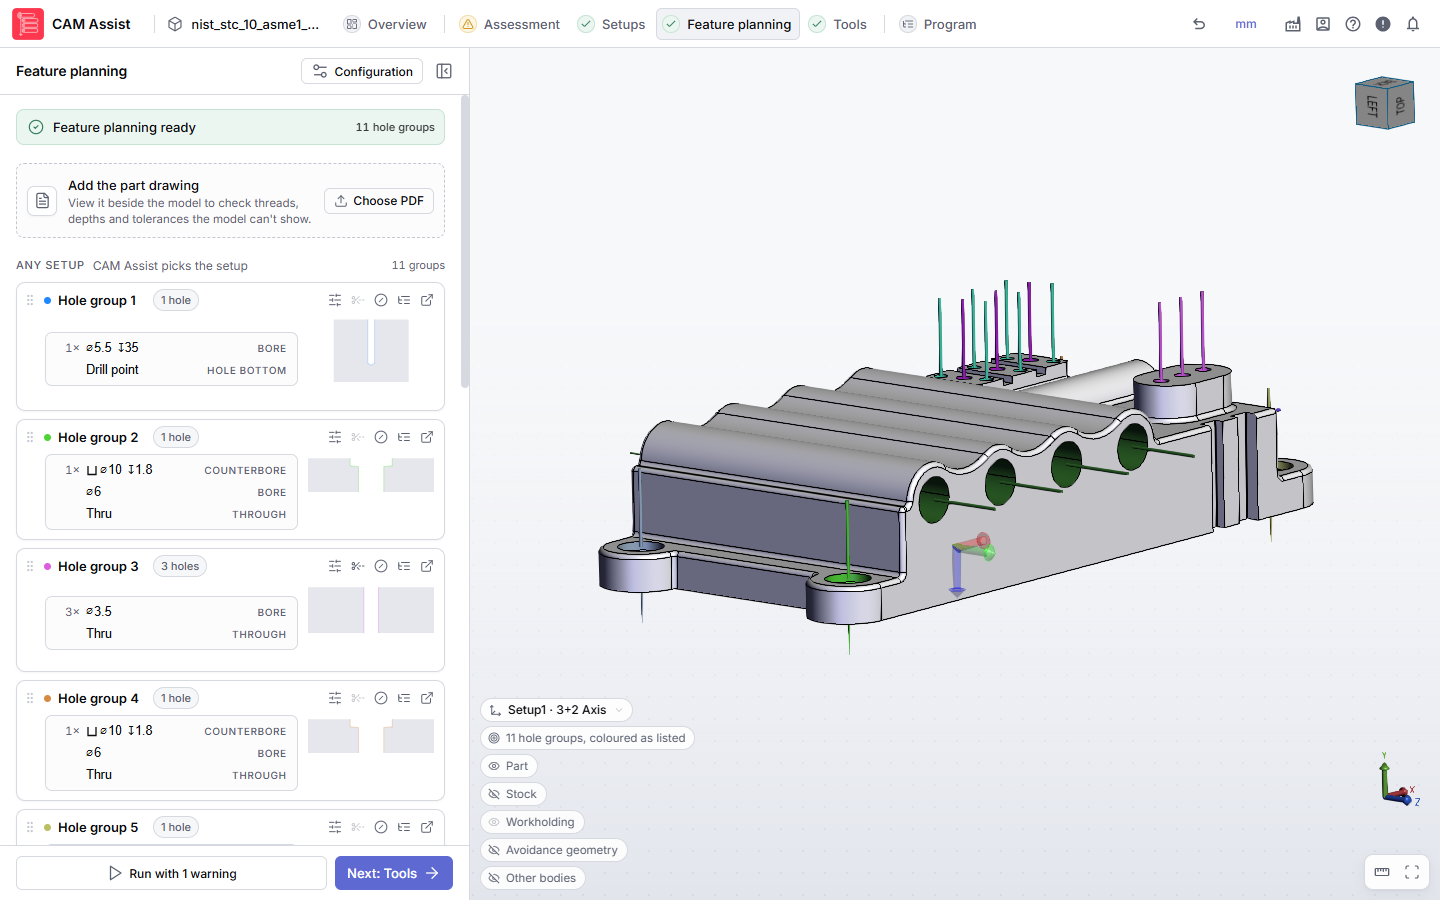
How the stage is laid out
| Area | What it shows |
|---|---|
| Status banner | Whether any hole group needs review. |
| Part drawing | Attach a PDF drawing to view beside the model. See Attach a part drawing to view while you work. |
| Any setup | Hole groups CAM Assist can machine in any setup. It picks the setup for each group. |
| One list per setup | Hole groups you've limited to that setup. |
| Not machined | Groups you've chosen not to machine as holes. |
Each card shows the group's name, how many holes it has, its callout (for example the diameter, depth and thread) and a diagram of the hole's shape. Needs attention means CAM Assist found a problem; the card lists it. See CAM Assist didn't drill, tap or ream a hole.
Check and edit a group
- Click the card to highlight its holes in the 3D view. Click it again, or click empty space, to clear the highlight.
- To change the group's drilling settings, click Group settings on the card.
- To change one feature of the hole, such as a bore or a thread, click it in the callout or the diagram.
- To see the whole hole with its dimensions, click Open details. Make your changes, then click Done to keep them or Cancel to discard them.
Changes you make on the card save automatically after a short pause. A message confirms "group updated", with Undo. For each setting, see Hole element settings.
Choose which setups machine a group
By default a group is under Any setup, and CAM Assist picks the setup its hole-making operations go in. You can limit a group to one or more setups. CAM Assist then only machines those holes in the setups you picked.
To limit a group to one setup:
- Drag the card by its grip (Drag to a setup) to that setup's list.
- A message confirms "group moved to setup", with Undo.
To limit a group to several setups:
- Click Group settings on the card, or Open details and then Overview.
- Under Restrict to setups, select each setup the group may use. With none selected, any setup may be used.
The card is listed under the first setup you picked, with a + chip for each other setup. Restrict to setups is only shown when the part has setups.
To let CAM Assist pick the setup again, drag the card back to Any setup, or clear every setup under Restrict to setups.
If none of the setups you picked can reach the holes, CAM Assist doesn't make them with a hole-making operation. See CAM Assist didn't drill, tap or ream a hole.
Split a group
- Click Split group on the card. It's unavailable for a group with one hole.
- Click the holes to move into the new group. New group and This group are shown in different colors. At least one hole must stay in the original group.
- Click Confirm.
A message confirms the split, with Undo.
Leave a group out
- Click Don't machine on the card, or drag it to Not machined. The group moves to Not machined.
- Choose how it's left out:
- Machined as geometry: CAM Assist doesn't drill the holes. It roughs and wall-finishes them like a pocket.
- Excluded from program: CAM Assist leaves the holes unmachined, for you to program yourself.
- To machine it as holes again, click Restore.
Check each hole in a group
- Click List this group's holes on the card. Each hole is listed as Hole 1, Hole 2 and so on.
- Click Invert direction next to a hole to machine it from the other end. It's shown only for holes that can be inverted.
- Click the back arrow to return to the hole groups.
If no holes are shown
- No holes were detected on this part.: CAM Assist found no holes.
- Couldn't load the holes for this part: click Try again. If it keeps failing, see "Couldn't finish assessing machinability".